This cake’s rich, fudgy dark chocolate flavors don’t skip a beat and you wouldn’t know it’s vegan. Customize for your occasion and make it two or four layers of delicious chocolate flavor!
- Easy
- 105 mins
- 8 servings
Ingredients
For the Ganache
- 1 3/4 C (240g) High Quality Vegan Dark Chocolate, 72% or 74%, rough chopped into 1/2" pieces or smaller (the smaller the better).
- 1 1/3 C (307g) Full Fat Coconut Milk (the canned variety), whisked to incorporate the fat and liquid
- 1/8 tsp Sea Salt
- 2 tsp Hazelnut Liquor (eg: Frangelico)
For the Cake
- 3/4 C (105g) Raw Hazelnuts, for decorating
- 1 2/3 C (380g) Nut Milk (eg: Almond, Soy, or Cashew)
- 1 Tbs Apple Cider Vinegar
- 1 1/2 C + 1 Tbs (225g) All Purpose Flour
- 1/2 C + 2 Tbs (72g) Hazelnut Flour
- 2/3 C (145g) Evaporated Cane Sugar
- 1/2 C Rodelle Gourmet Dutch-Processed Baking Cocoa
- 1 1/2 Tbs Cornstarch
- 1 1/2 tsp Baking Soda
- 1/2 tsp Sea Salt
- 1/3 C + 2 Tbs (80g) Coconut Oil, virgin, unrefined, melted and at room temp.
- 1 1/2 tsp Rodelle Vanilla Extract
- 1 1/4 tsp Rodelle Chocolate Extract (If you don't have Rodelle Chocolate Extract, you can use additional Vanilla Extract)
For the Simple Syrup
- 3 Tbs Evaporated Cane Sugar
- 3 Tbs Water
- 2 Tbs Hazelnut Liqueur
Uses
Occasions
Directions
For the Ganache (yields about 2 C or 500g)
- Place the chocolate in a mixing bowl.Set aside.
- In a small sauce pot add the coconut milk, salt and vanilla extract. Whisk to break up any clumps of fat.
- Heat the milk mixture on medium high heat until it scalds (tip: watch for bubbles to form around the outer edge of milk, this is 180F or 82C). Watch the milk closely as you don't want it to boil over. This can happen quick!
- Pour the milk over the chocolate. Give the bowl a shake to make sure the chocolate is covered. Let set for 2 minutes - this is required (set a timer).
- Stir gently to incorporate the milk and chocolate. Be patient here. This could take a few minutes.
- Once all the chocolate is melted and the ganache is smooth, place a piece of plastic wrap directly over the top of the ganache. This will eliminate a skin forming over the top.
- Pop in the fridge for one hour while you prepare and bake the cake.
For the Cake
- Spray 2, 6" (15cm) cake pans with pan spray. Line each with a round of parchment, then spray again, this time making sure the sides are sprayed too. Set aside. Preheat oven to 350F (180C).
- While the oven is preheating, toast the hazelnuts. These will be used to decorate the cake. Check hazelnuts at 8 minutes, then again at 10. They can go from toasty to burned fast, so keep an eye on them. Set aside to cool, then rough chop.
- In a medium spouted mixing bowl, whisk the nut milk and apple cider vinegar. Set aside while you mix the dry ingredients.
- In a large mixing bowl, sift the all purpose and hazelnut flours, sugar, Rodelle Baking Cocoa, cornstarch, baking soda and salt. You'll have some chunky bits of hazelnuts left in the sifter, so toss those in with the batter. If there are any large chunks, do not incorporate those into the cake. Whisk thoroughly. Set aside.
- To the milk mixture, add the coconut oil, and extracts. Whisk.
- Pour the wet ingredients into the dry ingredients. Gently stir until there are no more dry bits showing. The mixture will be thick.
- Divide equally into the prepared baking pans. Use an offset spatula to smooth the batter.
- Bake for 38-40 minutes. A toothpick should come out clean, with only a few bits of dry batter attached when done.
- Cool in pans for 20 minutes. Turn out on to a cooling rack to cool completely before icing or storing.
- Keep the parchment on the bottoms of the cake on.
- If holding overnight or freezing, wrap tightly in plastic wrap. Double wrap if freezing (freeze up to two weeks).
For the Simple Syrup
- In a small sauce pot, add the sugar and water. Bring to a boil and cook until the sugar is dissolved.
- Pour into a lidded container and stir in the hazelnut liqueur.
- Store in the refrigerator until ready to use.
- Finish the Ganache:
- While the cake is cooling, remove the ganache from the refrigerator.
- With a whisk attachment on a stand mixer, whip ganache on medium high speed for 3 - 4 minutes or until lighter and airy. You'll want to make sure it's not runny, but not so thick it's difficult to spread. Somewhere in-between. It will thicken quickly so keep an eye on it.
- At this point, depending on the temperature of your kitchen, you can leave the ganache on the counter until ready to use or pop it in the fridge. It needs to stay soft enough to spread, but you don't want it to start melting. Be patient here. Ganache can be fussy with regards to temperature, but it's worth the effort.
- If at anytime the ganache starts to get too warm and begins to get too soft to work with, pop it back in the refrigerator for 15 minutes, (this includes the entire cake if needed) then carry on.
To Assemble
- Find a piece of cardboard and cut it to 6" (15cm) round. This will help support the cake while putting it together. Have some parchment ready to set the sliced layers on. Be sure to handle the cake gently, supporting it with a spatula as you move it around. For a two or four layer cake, gently slice off the dome of each layer using a serrated knife. A cake stand is helpful here, turning as you let the knife do the work. Cutting off the tops yields a flat top cake. Snack on the cut offs or freeze them to make bon bons or cake pops later.
- Slice each half of cake into two equal rounds using a serrated knife. Set aside on parchment paper. Save one of the parchment lined pieces for the top layer, bottom up.
- Carefully, take the bottom of one of the rounds and place it upside down on the cardboard support. Remove the parchment. Brush the top with the simple syrup, covering the entire top. We do this twice for each layer.
- Smooth about 4 Tbs of ganache over the layer. Don't use more else there may not be enough icing to finish the cake. Repeat with each layer until the top layer is placed on.
- After placing the top layer of cake, put your hand, flat, on the top of the cake. Press gently, yet firmly, down making sure the cake is symmetrical and the layers are aligned. Make adjustments now if needed. At this point the ganache is probably warming up and your layers may seem to be sliding. Pop the entire cake in the fridge for about 15 minutes so the ganache can firm up again.
- Brush two coats of simple syrup over the top layer. You are now ready for the crumb coat which is a thin base layer of ganache that is the foundation of the final coat of ganache.
- Place about 1/2 C ganache on top on the cake. Begin working the ganache using an offset spatula to smooth and move the ganache over the sides of the cake. The crumb coat should be thin enough to see the cake layers on sides and top. Refrigerate for 30 minutes.
- For the final coat, add a heaping scoop of ganache on top of the cake. Start smoothing out the top of the cake first then moving to the sides. Use a pallet knife to smooth the ganache around all sides of the cake, stopping to patch areas that need more.
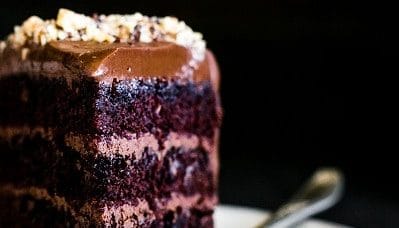
- Finish the cake by sprinkling the rough chopped toasted hazelnuts over the top and on the sides.
- Transfer the cake to a cake stand by sliding a large offset spatula under the cake. Very gently, lift the cake and placing the cake on a cake stand. Gently slide the offset spatula out from under the cake.
- To cut the cake, dip a large knife into very hot water. Wipe it dry then cut the cake. Do this for each cut you make for flawless cuts. Serve immediately.
- To store the cake, place plastic wrap directly on the exposed cake, then cover the top and other sides with a cake cover or plastic wrap. Store in the refrigerator if warm in the kitchen, or on the counter if the kitchen is cooler. But always serve at room temperature for a more pleasant mouthfeel. Store for up to three days.
- Notes: This recipe was created for Rodelle by Vanilla And Bean.