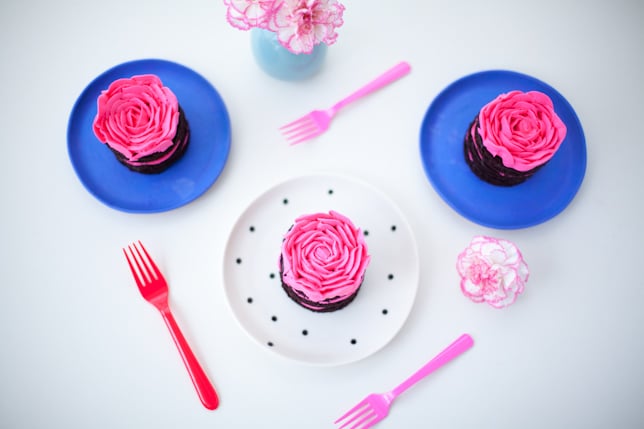
Dark chocolate cake with an easy-to-handle buttercream frosting makes these cakes a fun way to celebrate!
- Easy
- 90 mins
- 5 servings
Ingredients
For the Cakes
- 1 1/4 cup unbleached all purpose flour
- 1 cup Rodelle Organic Baking Cocoa
- 1 cup granulated white sugar
- 1 1/4 teaspoon baking soda
- 3/4 teaspoon baking powder
- 3/4 teaspoon kosher salt
- 2 large eggs
- 1 1/2 cups full fat high quality coconut milk
- 1/4 cup vegetable oil
- 1 teaspoon Rodelle Pure Vanilla Extract
- 1/4 cup warm water
For the Vanilla Buttercream
- 2 cups unsalted butter, room temperature
- 4 cups icing sugar, sifted
- 2 teaspoons Rodelle Pure Vanilla Extract
- dash of milk
- 1/2 teaspoon electric pink gel colour (or frosting color of your choice)
Uses
Occasions
Directions
Make the Cake
- Preheat the oven to 350 degrees. Lightly spray a 9 x 13 inch rimmed baking pan with vegetable oil and cut a piece of parchment paper to fit.
- In a large bowl (or bowl of a stand mixer) fitted with the paddle attachment, combine the dry ingredients on low speed until incorporated, about 1 minute.
- Add the eggs, coconut milk, vegetable oil, water and vanilla extract.
- Beat on low speed until fully incorporated, about two minutes.
- Pour batter into the prepared baking pan, using an offset spatula to spread evenly to the edges.
- Bake in middle rack of oven for 15-18 minutes, carefully turning pan halfway through baking.
- Check for doneness – cake is done when a toothpick inserted into the middle has no crumbs; cake will be springy.
- Cool on wire rack completely, then chill in freezer for 15-20 minutes to firm it up.
Make the Buttercream
- In the bowl of a stand mixer fitted with the paddle attachment, beat the butter on high speed until light and fluffy, about two minutes. Scrape down the side of the bowl.
- With the mixer turned off, add the four cups of icing sugar, vanilla, dash of milk and gel colour of your choice.
HOT TIP: Wrap the mixer tightly in a damp tea towel to prevent icing sugar explosion.
Turn the mixer on low to incorporate ingredients, then crank mixer to 11 (high speed) to beat the ingredients until buttercream is light and fluffy, two more minutes.
Assemble the Mini Cakes
- Fit your piping bag with the open star tip. Fill the piping bag with the pink buttercream.
- Remove the cake, still in the baking pan, from the freezer.
- Prepare five small dessert plates by adding a dab of buttercream to the center of each.
- Using the circle cutter, punch out the first cake layer and place onto the plate. Using the piping bag, pipe the top of the cake in a circular swirl, going from the outside inward
- Punch out the second cake layer and place on top of the buttercream, pressing down slightly to nestle it in place.
- Pipe the second cake layer.
- Punch out the third cake layer and place on top of the buttercream, again pressing down slightly to adhere.
- Swap out the open star tip for the rose petal tip. Hold the piping bag so the wide part of the petal tip is on the bottom. Begin piping in the center top of the cake – you’re going to pipe a little mound of buttercream as the center of your rose – squeeze the piping bag and at the same time move your hand in a zig zag motion, moving upward and creating a little mound of buttercream.
- Now you will make the first row of petals. With the piping bag at a 45 degree angle and the wider part of the petal tip on the bottom, squeeze the piping bag with your dominant hand in a making-a-rainbow type motion, attaching the first petal to the mound, while at the same time, and with your other hand, rotate the plate at the same time. Pipe-and-turn is your new favourite saying. Pipe the next petal, slightly overlapping the first, and the next petal, enclosing on the initial mound.
- Keep piping more petals, staggering the petals with each layer.
- Continue piping until you’ve reached the edge of the cake!
This recipe was created by Coco Cake Land for Rodelle. Click here to see the original post and many more helpful pictures!